Sunday, March 27, 2016

Baking: Challah Bread for Easter


Now, this is what my family has done for decades, but this time we couldn’t find our regular active dry yeast and proof it in warm water first.  We only had rapid rise bread dough yeast for our bread machine, and decided to try it and make a new loaf if it ended up a disaster.  The altered recipe for rapid rise yeast follows the regular recipe (below):

Ingredients:

1 package active dry yeast
1 ¼ cups warm (about 110°) water
1 teaspoon salt
¼ cup each of sugar and vegetable oil
2 eggs, room temperature, lightly beaten
5 to 5 ½ cups all-purpose flour
1 egg yolk beaten with 1 tablespoon water for brushing on bread before baking
About 1 tablespoon toasted sesame or poppy seeds for sprinkling on bread before baking

Directions:

In a large bowl, dissolve yeast in water.  Stir in salt, sugar, oil, and eggs.  Gradually beat in about 4 ½ cups of the flour to make a stiff dough.

Turn dough out onto a floured board and knead until smooth and satiny (5 to 20 minutes, or 10 minutes in a kitchen aid mixer with dough hook), adding flour as needed to prevent sticking.  Place dough in a greased bowl; turn over to grease top.  Cover and let rise in a warm place until doubled (about 2-3 hours, adapted from 1 ½ hours).  Punch dough down; knead briefly on floured board to release air.  Set aside about ¾ cup dough and cover it.

Divide remaining dough into 4 equal portions; roll each between your hands to form a strand about 20 inches long. Place the 4 strands length-wise on a large greased baking sheet (at least 14 by 17 inches, or put two sheets together, overlapping ends and wrapping the overlap with foil).  Pinch tops together, and braid as follows: pick up strand on right, bring it over next one, under the third, and over the fourth.  Repeat, always starting with strand on the right, until braid is complete.  Pinch ends together and tuck under loaf.
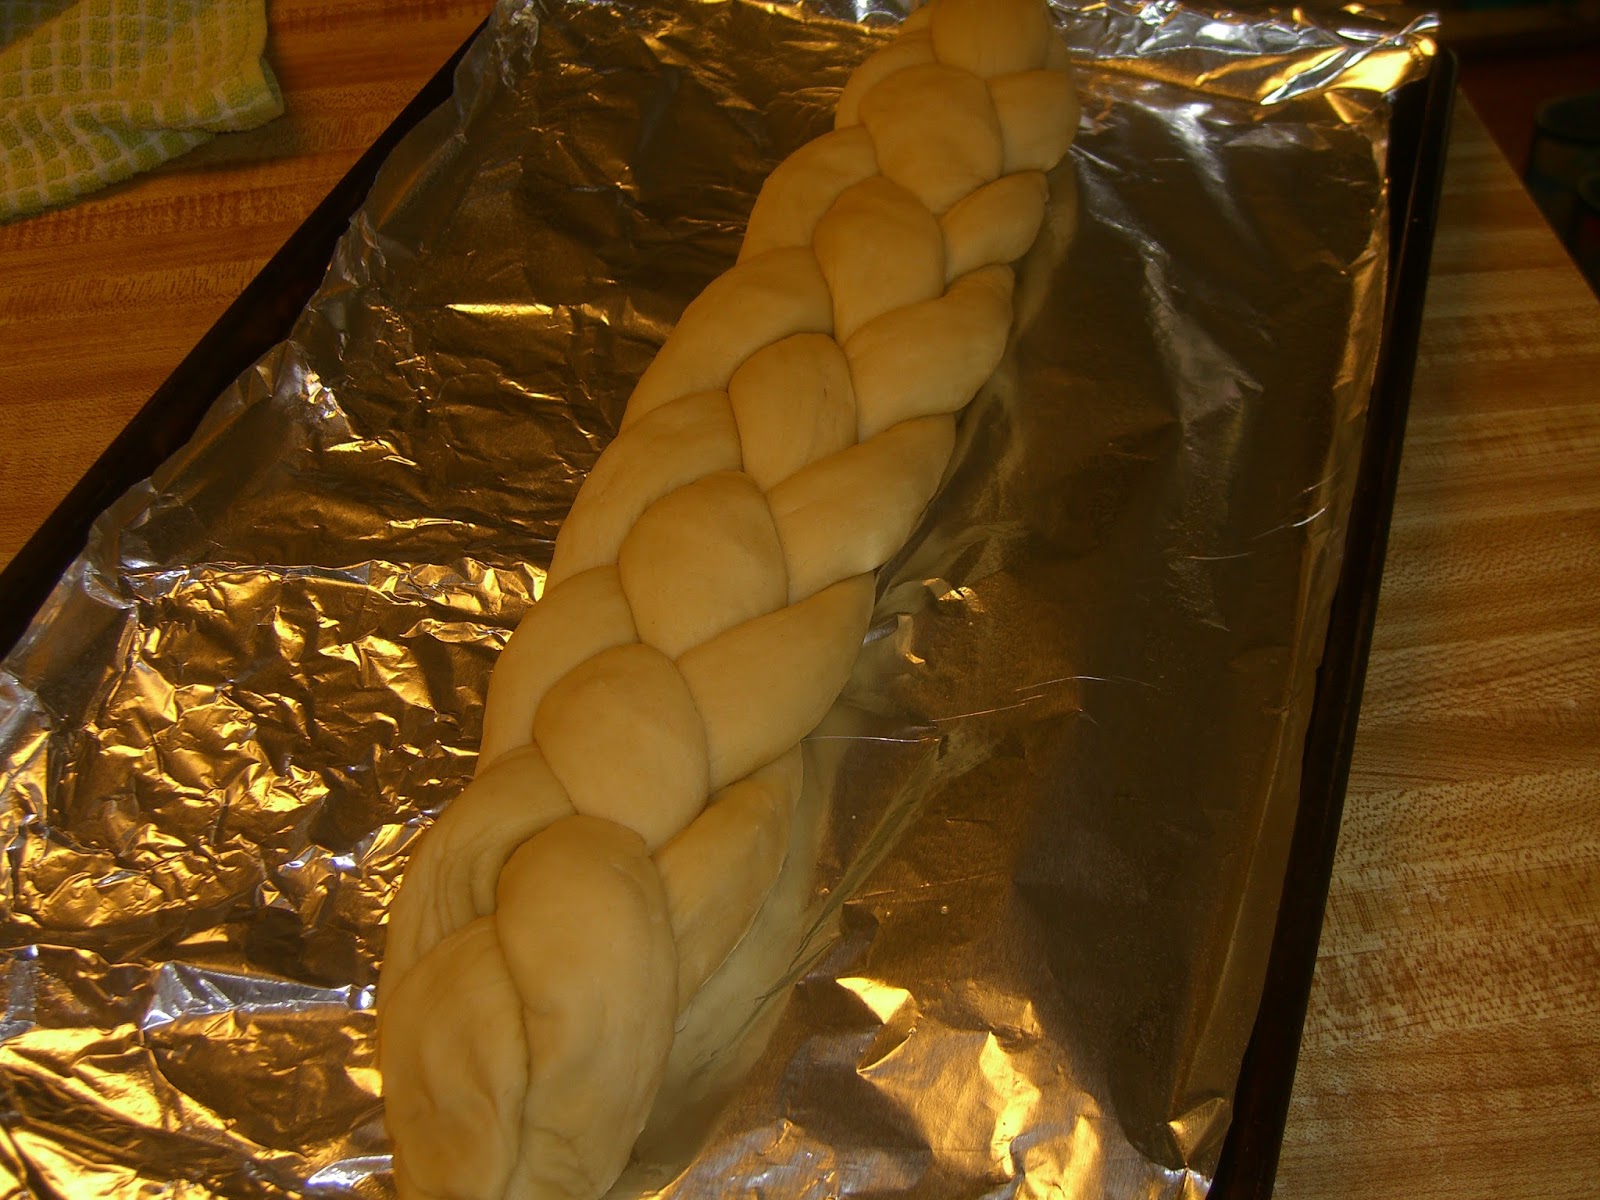


Roll reserved dough into a strand about 15 inches long, cut into 3 pieces, and make a small 3-strand braid.  Layer on top center of large braid.  Cover and let rise in a warm place until almost doubled, 2-3 hours (adapted from 1 hour).


Preheat oven to 350°.

Using a pastry brush or your fingers, spread egg yolk mixture evenly over braids; sprinkle with seeds.  Bake in a preheated oven for 30-35 minutes or until loaf is golden brown.  Let cool on rack.  This recipe makes one loaf.


Altered recipe:

We heated the oil and water to about 130°, then added the oil and water the dry ingredients, including the rapid rise yeast.  We then added the two lightly beaten eggs and the rest of the mixing was normal.  The bread dough normally rises twice, but this time the first time was (as per the directions on the yeast package), for only resting (not rising) 10 minutes in the greased bowl.  The second rise, which is when the braids rest for 2-3 hours, was normal.  It turned out fine, if a slightly less risen, and more dense.  That was the fault of us not using the proper yeast.  So it worked to save time, but will not make the best possible Challah bread!  We used it with butter and honey last night and for French toast this morning, and it was pretty good.  I definitely recommend good regular yeast though!

Braiding images from the book, in case of clarification:


Adapted from the Sunset Breads, copyright 1984, fourth edition.

Sunday, March 20, 2016

Making Your Own Maple (Boxelder) Syrup


Making your own maple syrup is easier than you probably think.  All you need are at least a handful of maple-type trees, cold nights, and warmish days.  This works perfectly for a few weeks in late Winter/early Spring in New England.  Okay, so it probably won’t work if you don’t live in a similar environment to New England, but if you ever visit someone who does, talk them into trying it!

The end of February into March starts to warm up during the day, and stays cold at night, this is ideal for drilling trees for sap.  Maple is ideal, of course, and we use a few Boxelders and Maples in our yard.  Boxelders are a maple-like tree and produces good-quality syrup, but sugar maple would probably be the best to try.  Boxelders also come with these cute little red and black insects that are totally harmless but love the trees and end up in your house in the winter endlessly wandering until the weather warms in Spring.  We used to have more trees, and get much less syrup than we did years ago.  Those who don’t live in a city should have more opportunities to get more sap than we do.

After determining the ideal temperature change for sap to flow, drill a few inches with a thick drill-bit, and hammer a tap into your chosen trees.  The tap is a short metal tube that brings the sap from the tree to the surface, into a bucket (we use clean gallon milk cartons), which hangs on a built-in hook.


There should be several cups of sap per tree collected once or twice a day, and sometimes more.  The best times to check the buckets are when the warmest part of the day is over.  Then you bring in the sap, and strain it multiple times (coffee filter on a strainer is slow, but works well), before pouring the sap into a large pot to simmer for several hours.  KEEP AN EYE ON THE POT!  It can easily boil over, and you will need to watch it for the next steps in the process.  Be sure to skim the surface of the pot continually with a ladle with holes, as foam will develop.


I adore the scent of boiling sap.  It needs to be made into a candle from a quality candle maker.  It's fresh and slightly sweet, but also slightly woody, and totally addicting.


Use a candy thermometer to check the temperature of the syrup, but you should be able to figure out it is ready by the deep amber color and syrupy consistency.  To can, you simply take clean canning jars and their lids and boil them for a few seconds, then remove from the boiling water with tongs and pour the hot syrup into the canning jars and screw on the lids.  Within a few minutes, the lids would make a "pop", and be totally flat on top.  There are many resources on canning if you need more guidance.  Good luck and happy syruping!

Tuesday, March 15, 2016

Joppa Hill Farm in the Winter


This walk is a loop, and you can either start by the bee skeps on the right and head through the woods, or start on the left past a sheep pasture guarded by an electric fence.  This will lead you by the farm area first, then you can decide to go straight on the next fork to the pond, or right and across the fields then the woods.


This is where you can actually see part of the farm, and as you walk down this road there are several pens of livestock, including goats, sheep, rabbits, and alpacas.


The field over the side of this old stone wall sometimes holds a few horses from the farm.


The stream made intricate ice patterns as it wove its way into the pond.


This trail winds over a pasture, and is bright and sunny in the Summer, but is quite beautiful this time of year as well.


Tora loves running over boardwalks, and this walk actually connects to another NH walk that is filled with boardwalks (more than here), which is Pulpit Rock in Bedford.


Beautiful swampy forest, filled with snow and snow wash from the mountains.  This pool might be a vernal pool which is only filled with water in the Spring to allow for eggs and tadpoles to live and hatch.


This is a classic erratic boulder right next to a classic New England stone wall.  There were a few large boundary trees as well, and it is easy to transport yourself two hundred or more years back in the past.


Of course, Tora always loves the chance to go in the water, and she also loves ice, and as it's all melted now, this was one of her last chances to break up some ice!

Sunday, March 13, 2016

Haul and First Impression: Cantu Natural Hair Leave-In Conditioner and Cantu Natural Hair Curl-Enhancing Cream (and General Wavy/Curly Hair Rant)


I have been researching curly hair routines for the last few weeks, and on Monday walked a couple of blocks in the rain to the neighboring Walgreens, which I almost never go to anymore, unless don’t feel like driving to the much newer CVS or Walmart or something.  Anyway, I did some searching for how to style wavy to curly hair, and the Curly Girl method website, blogs, and videos helping to explain it came up.  I had gotten the Curly Girl’s Hair Guide book for my best friend back for her birthday in December.  According to the book, she has combination corkscrew and spiral curls (like Botticelli angels), or corkicelli, with very fine hair.  The past few months (even before I got her the book), she has been taking a more active interest in her curls, and has told me how she styles them.  It pretty much comes down to conditioner for her, and lots of it. 

Now, the conditioner you use shouldn’t be expensive, because if you have wavy to curly hair, you understand that these hair types are often dry, and dry hair craves conditioner.  Many people recommend the Suave Naturals line (less than $2!), particularly the coconut, as I believe it has coconut oil in it, a wonderful addition to any hair care routine, no matter the hair type.  I also saw many people commenting on the Shea Moisture Line, but it was a little expensive for what I wanted it for (lots of conditioner for both deep conditioning treatment once or twice a week, and as a leave-in after a shower before adding curl products).  I then discovered the Cantu line.

My impression of these two Cantu products (Cantu Leave-In Conditioner and Cantu Natural Hair Curl-Enhancing Cream)  is positive, they are full of conditioning oils, smell light and tropical, and appear to do what they describe, for half the price of the Shea Moisture products of the similar type and same size.


I don’t think my hair is particularly dry, but as I do get the frizzies around my crown, and often get exhausted with my curls and brush them out into what turns into waves if I’m lucky, and poof if I’m not.  I have a love-hate relationship with my texture, and usually prefer the brushed out waves to the semi-curls I get when I air-dry with no brushing.  According to the Curly-Girl book and website, I have between 2b and 3a type hair, which is medium textured hair, with medium to heavy wave some days to light curl other days.  The first thing I did a couple of months ago was to change my shampoo regimen to sulphate-free shampoo (I have so far only tried the OGX line in the coconut milk), and to deep condition my hair overnight.  I have now deep-conditioned my hair overnight twice with the Cantu Leave-In Conditioner, and in the morning I wash it (focusing on the roots) with the OGX shampoo, then condition.  On these washing days I then blot my hair until it is dampish-wet, and add more Leave-in Conditioner and comb it through.  I then use my fingers to disperse a dime-sized glob of the Cantu Curl-Defining Cream, and start to scrunch.  Some days I use a tee-shirt as a hair wrap and plopping method to define the curls (there are YouTube videos to explain this technique), or let it air dry while scrunching upside-down.  Other wash days I have been trying gel or my favorite mousse (Tresemme Humidity-Control), and scrunch until mostly dry.

What I’ve noticed I do differently than some people is I don’t over-use products.  I don’t like to have too much of anything in my hair unless it’s a mask, as I like my hair to have natural movement.  I don’t like my hair to look too defined, or too messy.  It really takes trial and error, and so far I am enjoying these two new additions to my changing routine.

(I bought these products on my own, and am not being paid to review.)

Sunday, March 6, 2016

How to Fix Formatting Issues Within Blogger: Font and Size of Font Change in Draft Versus Published


Now, I work my posted in Microsoft Word, because I’m used to it, and that’s also how I write my stories and most other documents.  Before a couple of weeks ago, this wasn’t an issue.  I copy and paste using CTRL A to select all, and CTRL C to copy into my draft blog at blogger.  I have done over twenty blogs like this, and all of a sudden, at the beginning of February, I wrote a blog that looked great in the draft and all different fonts in the published version.  I apologize to anyone who noticed while I still had it up before fixing it, as it took a while to find the right answer.  Needless to say I didn’t find the answer online, even after hours of searching, and finally tried copying my text into a different version of a text document.  That didn’t work.  I tried fiddling with the HTML section and copying directly into there.  No success.  I tried the “fix formatting” button at the top right hand of the draft.  It made the font universal, finally, but it all messed up again when I changed it to my desired font, Georgia.  ERRGG!!!


I decided to try one more type of document to copy my text into and decided on google docs, as it’s what I used for years in college and it never let me down.  I actually got nostalgic looking through my old anthropology and geology papers.

Google docs came through!!  It showed me exactly what I saw when I looked at the preview of the post that had caused me so much vexation.  The first and last paragraph were one font and the middle two another, which no amount of changing in the draft had made any difference.  I simply had to select all the text in google docs and change the font size and type to match completely, and copied that perfect version into my draft.  SUCCESS!


I guess Microsoft Word has its own formatting “thing” that doesn’t match with some other platforms, such as google docs and blogger.  Well, this is my take on it, and I’m not as tech-savvy with computers as many others.  I will still continue to use Word, because that’s how I’ve organized so many other posts before this one.  At least I understand this quirk to some extent now.

I hope this helped anyone who was stuck in the same formatting quagmire as me, and if not, at least found it somehow useful!